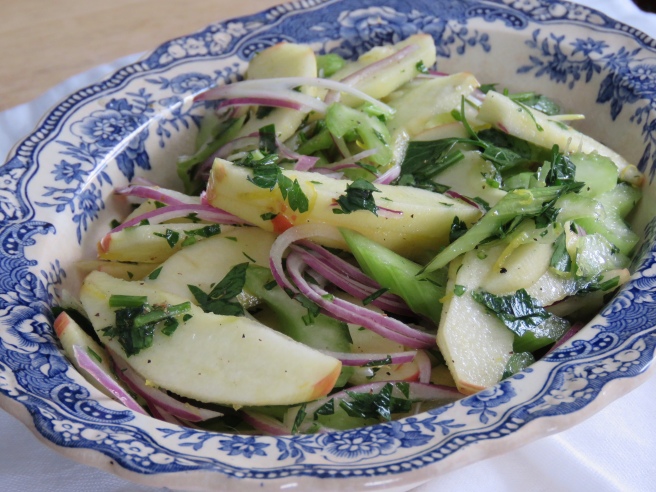
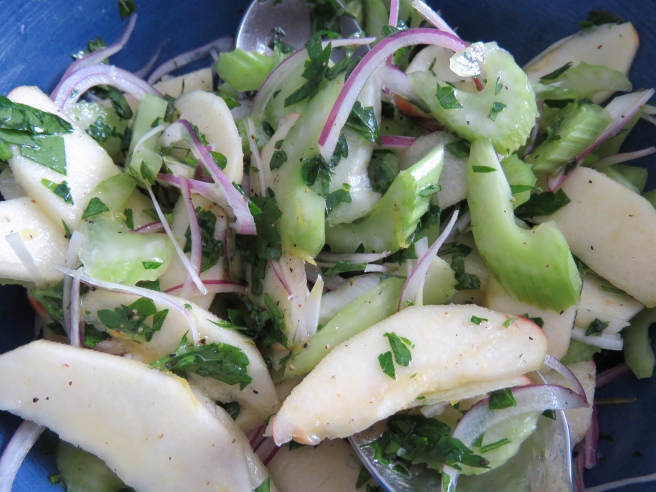
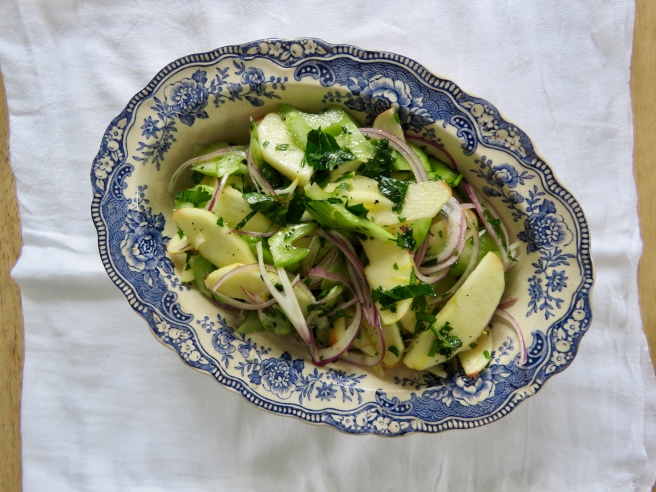
A circuitous route (as usual) brought me to this recipe for Dutch Celery Apple Salad. I was riffling through “Dutch Feast,” by Emily Wight when I came across a recipe for Celery Salad. Aside from the rather mundane title, It sounded crisp and interesting, what with the inclusion of a sliced green apple. But it also included fresh tarragon, and the thought of going to the grocery store in the snow and spending $2.99 for some limp and bruised tarragon tightly packed in a little plastic container did not appeal. So I went online and found a version at myrecipes.com that sounded doable, made it, and my husband Jim loved it. This doesn’t always happen. But the combination of crisp celery, sweet apple, tangy onion and fresh lemon juice with the green note of parsley is delicious and a bit surprising. So here is the recipe, including some of my own twists and turns.
Dutch Celery-Apple Salad
2 tablespoons extra-virgin olive oil
the juice of one lemon
finely grated peel of one lemon
1/4 teaspoon Kosher salt
1/4 teaspoon freshly grated black pepper
2 cups peeled and thinly sliced apples
2 cups sliced celery
1/4 cup chopped parsley
1/3 cup thinly sliced red onion
Combine the first five ingredients in a bowl, and then add the remaining ingredients. Toss; taste, and adjust seasoning if needed.
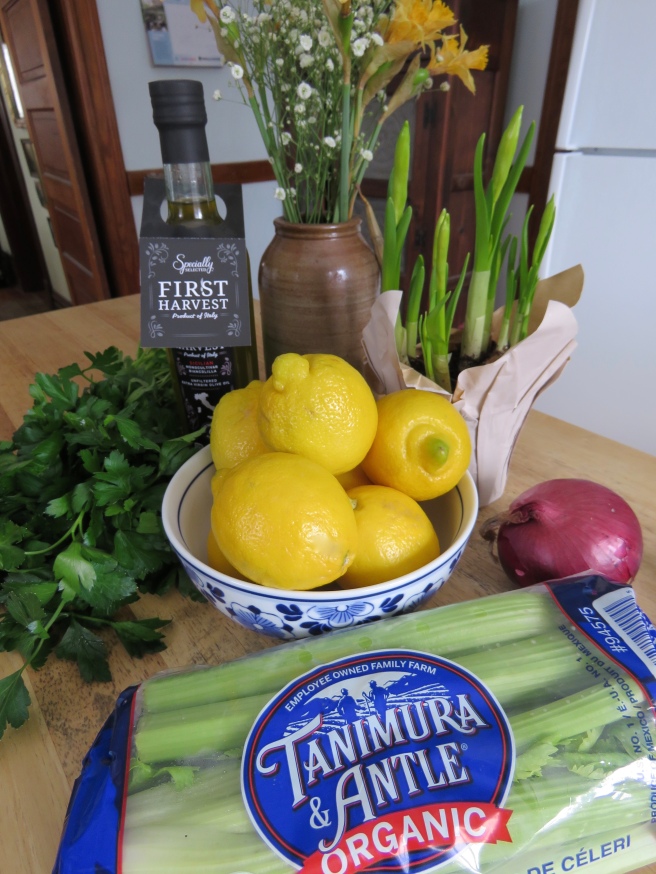
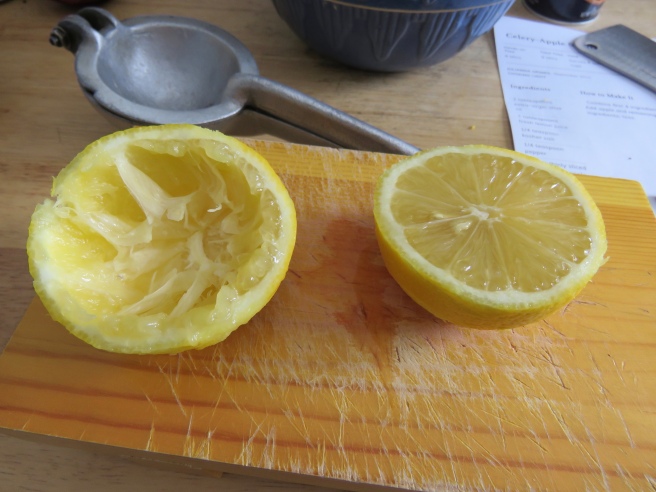
Dutch cooking is an interesting combination of the very plain and the very exotic. I found the cover to be quite inspirational, as it made me think of all the blue and white china bowls and plates I have collected.I used organic Pink Lady apples. So photogenic! They are a little more beaten up than non-organic, but not by much, and are crisp and tasty.From Trader Joe’s.The ingredients (not including the daffodil plant!).I finely grated the lemon rind prior to juicing. Not sure I needed to include another picture of a sliced lemon, except to make the point that using a fresh lemon makes an enormous difference in the finished salad. Juice in the little plastic lemon thing is flat tasting.Freshly ground pepper and kosher salt also add a fresh taste to the salad. I bought the pepper grinder at Aldi, and periodically re-fill it.
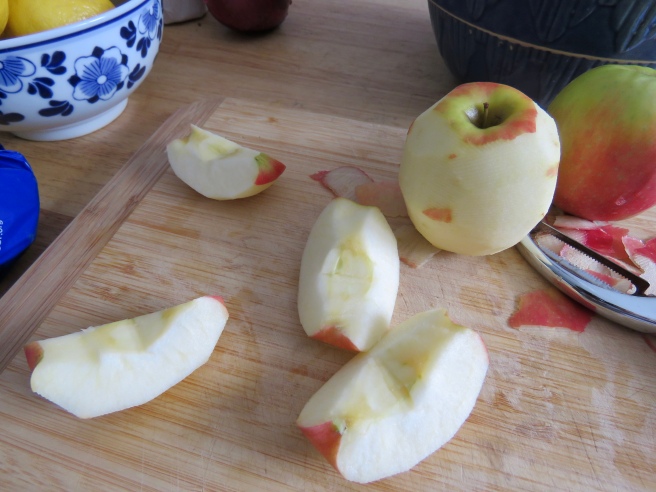
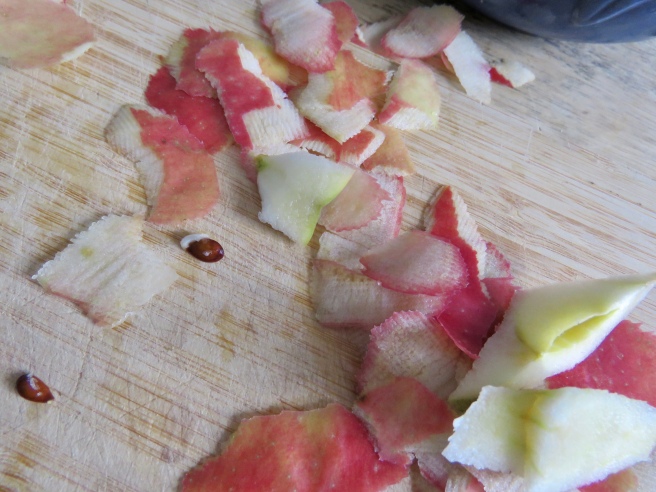
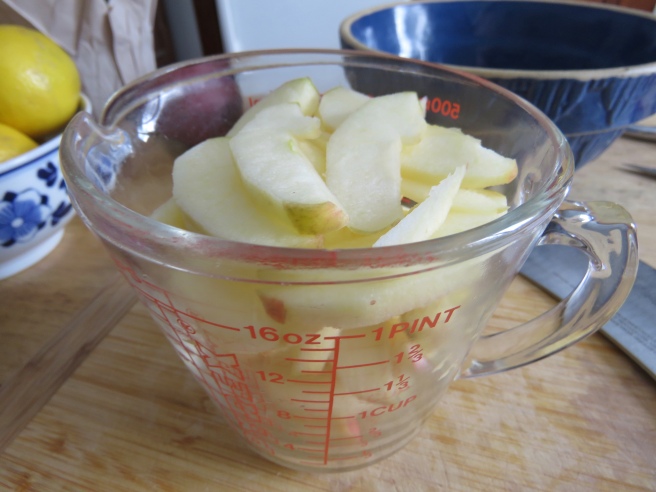
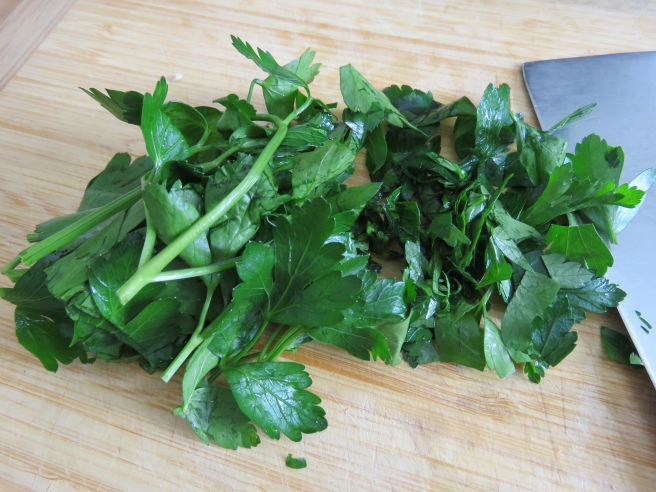
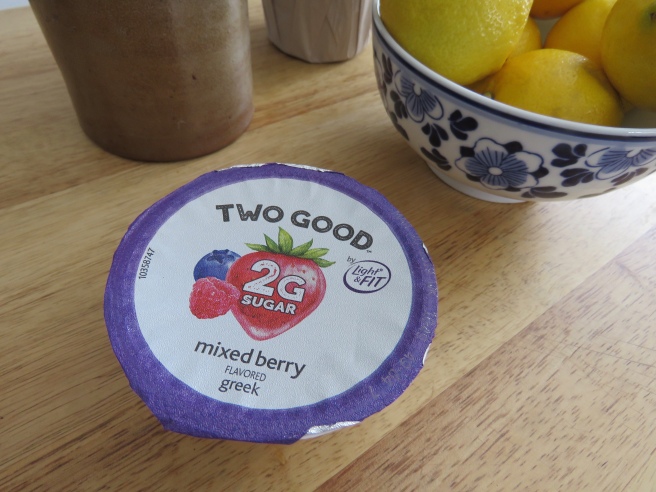
I actually only used two apples. The bowl has the lemon mixture ready.Peel the apple, cut into quarters, cut out the seeds and core. Then slice each quarter thinly.Even apple peels are surprisingly photogenic.Two medium-sized apples will yield two cups of sliced apples.Immediately mix the apples into the lemon mixture, to prevent browning.Thinly slice the celery on the bias. Makes it prettier.Love celery leaves! They can be chopped up and added to a stew or stir-fry.A big, beautiful bunch of Italian parsley.Coarsely chopping your parsley. Estimate the amount, and save yourself washing up a measuring cup.Coarsely chopped parsley.I used about a third of this onion, and set aside the rest for another use.The best way to get thinly sliced onion is to use a mandoline. It has a sharp blade, though, so be careful!The thinly sliced red onion.The salad ready to toss.Salad tossed and ready to go. I will be serving it in a pretty blue and white bowl, though. You eat first with your eyes.The colors are quite pretty, and the flavor combination is so good!Ready to serve. We’ll be having this with hamburger patties, rather mundane, I know, but the combination works.This gives me a chance to use one of my blue and white china bowls.For dessert, we will have my fave yogurt (only three grams of carbs) along with fresh blueberries.
Making notes: There are a number of versions of this salad on the Web–some include Dijon mustard, others include dried cranberries, some use celery root instead of celery–which may be the way it was made originally–and one adds in green grapes. I think it would be interesting with chopped cilantro. The bottom line, though, is the simpatico flavor combination of celery, apple, onion and parsley. This would be good served with the Chili Soup I featured in my last blog. Or with baked chicken. Or sautéed pork chops. Hope you enjoy!
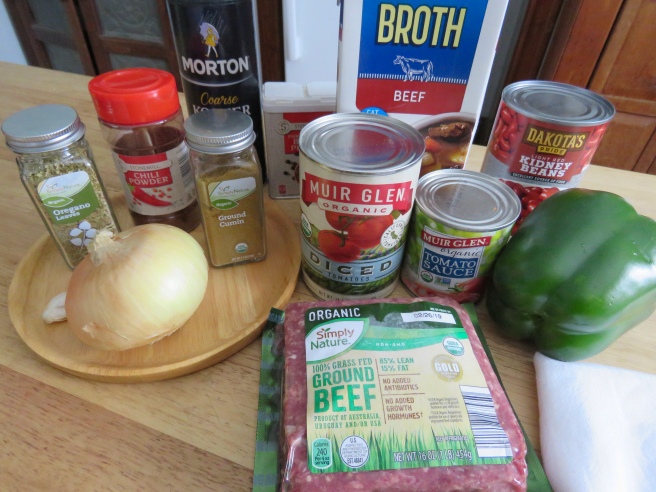
It was 24 below last week, or was it 27 below? Either way, I found myself bundling up and thinking about soup, chili soup, to be exact. I had seen the recipe in Low-Carb Slow & Easy (a crockpot cookbook) by Frances Towner Giedt recently, and it was filed away in the back of my mind ready for just such chilly, or is it chili? weather.
I love using my crockpot–there’s that smug feeling you can have all day that dinner is ready–and I’m always on the lookout for good crockpot recipes. So I made the soup, and it was good, but a bit on the bland and weak side, and chili soup should not be bland! So yesterday I went to work and beefed it up, so to speak. It burbled quietly all day, I felt smug, and we had it for supper. Even though the temperature had soared to 43 above, its spicy warmth really hit the spot. Here is the recipe.
Chili Soup
one pound ground beef
1 onion, chopped
1 green pepper, chopped
1 garlic clove, crushed
1 8-oz. can tomato sauce
1 14-1/2 oz. can diced tomatoes
1 15-oz. can kidney beans, drained
4 teaspoons chili powder
1 teaspoon dried oregano
1/2 teaspoon ground cumin
one teaspoon salt
1/4 teaspoon black pepper
2 cups beef broth
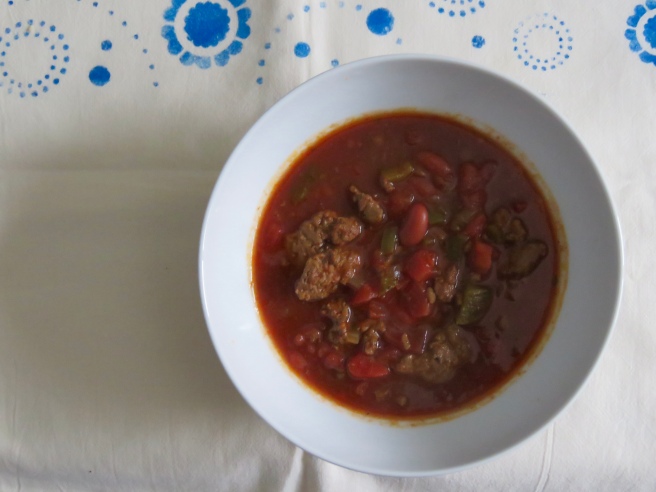
Brown the ground beef in a skillet, and then add the chopped onion, green pepper and garlic. Cook until vegetables are softened. Transfer mixture to your slow cooker. Stir in the tomato sauce, diced tomatoes, the beans, chili powder, oregano, cumin, salt and pepper. Then pour in the beef broth and stir. Cook on LOW for about six to eight hours.
To serve, ladle soup into bowls and top with any or all of the following: sour cream, grated cheese, sliced limes, sliced carrots, chopped cilantro.
Ingredients. The grass fed beef comes from Aldi–it costs a bit more than the regular beef, but is a bit kinder on the environment and to the cows. I tried the Muir Glen Organic tomato products just to see if they were worth the cost, which is more than non-organic brands.You only need an average-sized onion for this recipe, so I cut mine in half and stored the other half in the fridge in a glass container.It’s that time of year! All my garlic is sprouting! I was able to find one unsprouted clove, though I’m not sure if it matters.Chopping the green pepper.Waste not, want not. My grandmother, who lived during the Depression, taught me to never waste anything, and she was right. So I chopped the stem end, as well.Lens got a bit fogged up here, but after the beef is browned, add the onion, green pepper and crushed garlic clove.While the vegetables are cooking, you can mix the spices.Ingredients being stirred in the crockpot. I almost showed you a picture of my crockpot, but it’s a battered old thing. Works perfectly, though. At this point, we fast forward about 6 to 8 hours to dinnertime.When dinner time approaches, you can take a leisurely stroll into the kitchen, and prepare a few items for topping off the soup. Some sliced limes sound good.The soup, ladled into a bowl, unadorned.Soup adorned! The method for cutting the carrot coins can be found in my last post. You can also stir the juice of one lime into the soup in the crockpot–adds a nice tang. The chopped cilantro adds a fresh green note.Two lime slices are even better!
Making notes:I wish this could be made without browning the beef and vegetables first, but I think the beef would end up as lumps in the bottom of the pot, and it just tastes better browned first. With the chili powder, this is a slightly spicy chili, but you can add hot pepper, as well. I also sprinkled the soup with a Turkish red pepper, which adds heat and flavor. By the way, the Muir Glen organic tomato products were noticeably fresher and tastier than other brands. I was a little surprised, to tell the truth. Definitely would purchase them again.
I hesitated to offer this recipe, because it’s just a humble chili soup. But it’s the kind of thing that can go into your regular recipe rotation–it’s delicious, easy, inexpensive, and works all year round, not just on cold days. In the summer, you could keep your kitchen cool with this, and serve with cold beer. And you can add your own creative toppings!
Puddings in jail! A refrigerator jail, that is. Just some instant, no sugar vanilla pudding, topped with fresh strawberries. Made a nice dessert after the chili.
Meanwhile, I’ve been keeping busy with nature journaling. Here is my latest page, all about hairstreak butterflies. I invite you to please stop by my blog, called My Illinois Nature Journal, for more pages! Peace to you. Fran
I’ve gone the low-carb route, and the sailing has been pretty smooth. I’ve found that the fewer carbs (bread, potatoes, rice, etc.) you eat, the less you want. It’s a bit mysterious, but that’s how it has worked for me. I can look at a basket of warm bread set on the table at a restaurant, and remain unmoved. Potatoes? Don’t need them. Rice? Nope. Pasta? A dim memory.
There is one thing, though, that I have been craving, and that’s pizza. A nice crispy crusted pizza with mushrooms, stringy melted cheese and sausage. I thought having such pizza was impossible until I discovered this recipe for Donald’s Deep-Dish Pizza Quiche in “The Low-Carb Gourmet,” by Karen Barnaby. A rich egg custard layer serves as the pizza crust, and then the cheese, mushrooms and sausage are layered on. It’s so good!
I have, though, with apologies to Donald, lightened the recipe up considerably. It called for whipping cream and a ton of cheese, and the first time I made it, it was almost too rich. My version here is still delicious, but way more digestible.
Deep-dish Pizza Quiche
4 ounces neufchâtel cream cheese, softened
4 eggs
1/3 cup milk
1/4 cup grated Parmesan cheese
1 tablespoon finely chopped green onion
1/2 teaspoon dried oregano
dash of salt and pepper
1 clove of garlic, put through press
2 cups grated “Italian” cheese
1 8-ounce can tomato sauce
1 4-ounce can sliced mushrooms
1/2 to 3/4 pound of Italian sausage, cooked
Preheat oven to 350 degrees. Butter a 13 x 9-inch Pyrex baking dish.
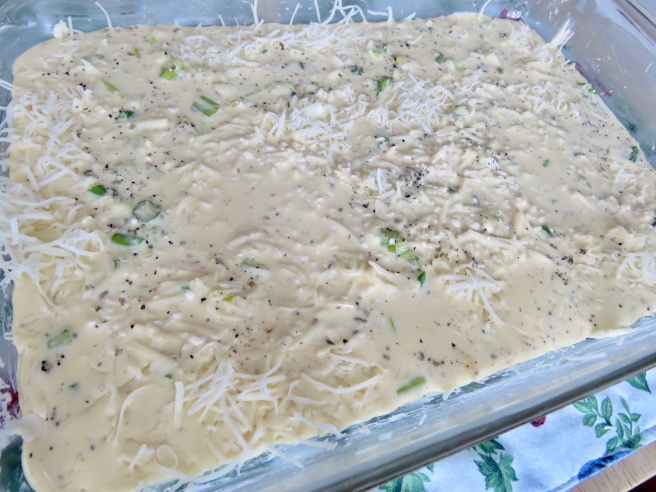
In a medium-size bowl, with a hand mixer, blend together the softened cream cheese and eggs until smooth. Add the milk, Parmesan, green onion, garlic, oregano and the salt and pepper.
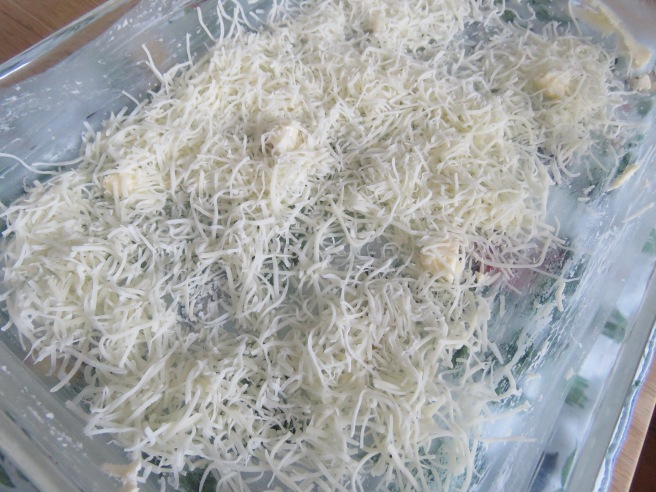
Scatter one cup of the cheese in the prepared baking dish. Pour the egg mixture over the cheese, and bake for 15 to 20 minutes, or until firm.
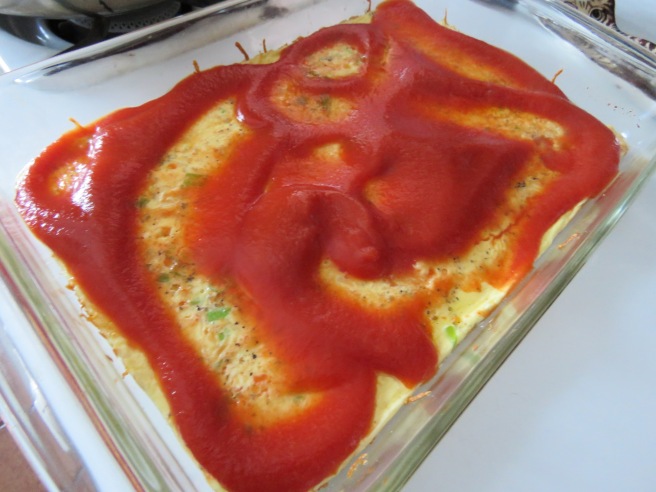
Turn the heat up to 425 degrees. Spread the baked egg custard with the tomato sauce. Scatter the cooked sausage and mushrooms over the top. Cover with the remaining one cup of cheese. Return to the oven and bake for another 10 to 15 minutes, or until cheese topping is melted and browned. Let it set for 5 to 10 minutes before cutting.
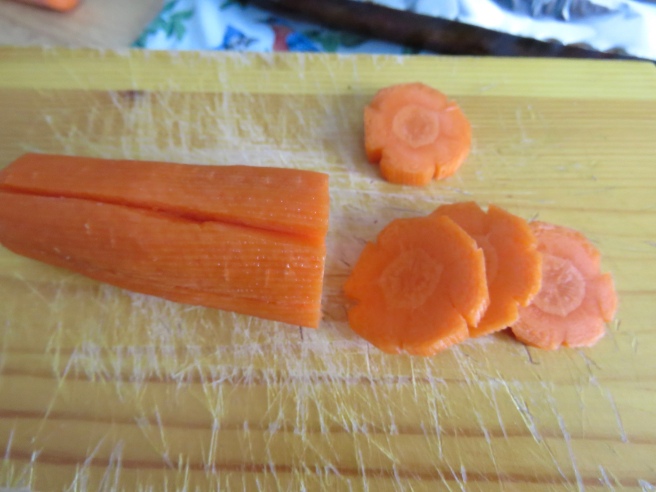
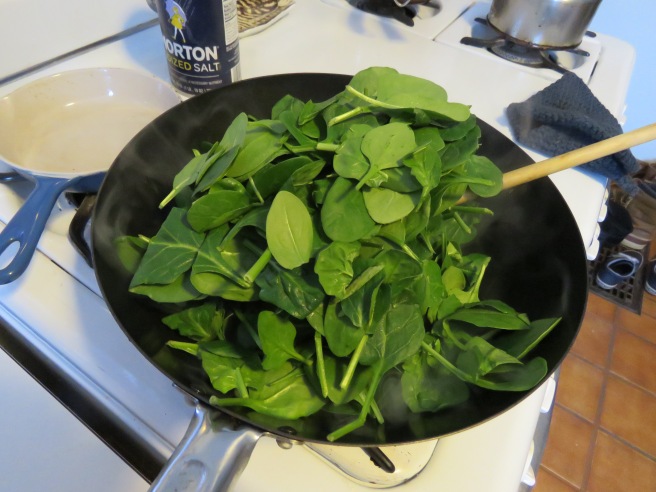
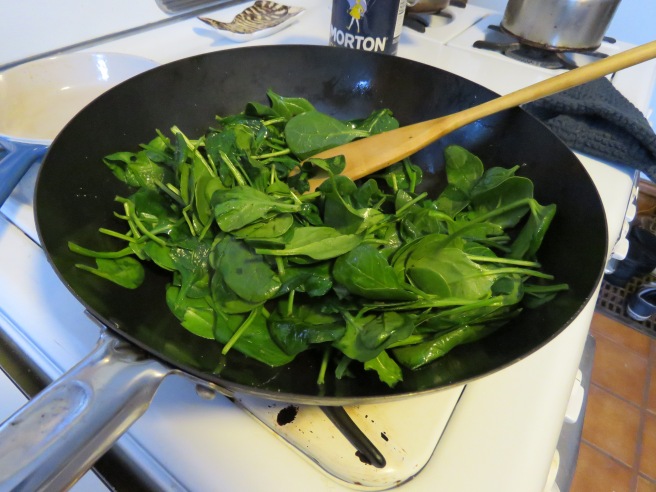
Ingredients. The grated cheese is a mixture of Italian cheeses, including mozzarella.Use half a brick of cream cheese, in this case a light version, called neufchâtel. It will need to be softened. About 15 seconds on high in a microwave works.Surprise! When I cut into the cream cheese it was hollow! Must have been a big air bubble. I have sent an email about this to the manufacturer!Fortunately, the other half was okay! Just be sure it’s softened before proceeding.The browned Italian sausage is ready to go. Pour off any extra fat.The original recipe called for whipping cream, but this whole milk worked fine.With a hand mixer, mix one egg into the softened cream cheese to smooth it out. Then add the other three eggs and mix until smooth.The original recipe called for chives, but green onions are easier to find. I used two finely chopped green onions, but I found that one was enough. So you can go more onion-y or less onion-y!I stirred the next ingredients in with a spatula.Sprinkle one cup of the grated cheese over the bottom of the buttered baking dish.Pour the egg batter over the cheese and smooth out. At this point, it looks unpromising, I know.After about 15 minutes, the egg mixture should be firm. This is your “crust.”Turn up heat to 425 degrees. Pour the contents of an 8-ounce can of tomato sauce over the baked egg custard. It’s starting to look like pizza!Ready for the oven–topped with the cheese, cooked sausage and sliced mushrooms (if you like).Remove from the oven when the cheese is melted and browned.To go with, I peeled a chubby carrot and cut grooves in the sides. Then I sliced off carrot “flowers” with a knife. It’s the little things!A pretty garnish, ready to go.We’re not done! Next, an easy spinach with garlic saute. Your bag may not be as exciting!Heat up a glug of extra virgin olive oil in a wok, and add one crushed clove of garlic.Pour in your spinach, and start tossing over the high heat. It looks like a lot, but will melt down. Sprinkle with salt and pepper.I’m melting . . .I’m melting . . .Ready!A slice of “pizza,” the carrots and the spinach. My food photography skills deteriorate the closer I get to suppertime!The pizza cuts nicely, and can be served with a spatula.If you have a magic refrigerator, you will open its door and find two little bowls of chocolate pudding. Actually, I don’t have a magic refrigerator either–I made these with sugar-free instant chocolate pudding, decorating them with little shards of dark chocolate.Or, you could have cut-up fruit, or you could try this yogurt. If you feel uneasy about artificial sweeteners, this brand is made with stevia, an herb. It’s delicious and creamy, with only three carbs.With a glass of red wine, we had a nice dinner. Leftovers will be good for lunch!
This recipe for Black Bean Brownies–bear with me for a moment–popped up as I mulled over what to eat for dessert when eating low-carb. Dessert is a surprisingly important part of a meal, at least for me, as a good meal with dessert can be an oasis in the workaday world.
Black Bean Brownie recipes have been floating around for years, as they really surprise people as to how good they are. This recipe is an amalgam of a number of recipes. How does it qualify for low carb eating? The protein and fiber of the beans slow and lessen any insulin spike after eating. And honey has a lower glycemic rating than sugar, meaning that it raises your blood sugar more slowly than sugar. So the calorie count of one of these brownies is not lower than a “regular” brownie, but it’s way easier on your health.
The proof is in the pudding, and I can say that these are absolutely delicious–no discernible bean flavor and with a wonderfully light, moist almost mousse-like texture. So that is why I called this post “Delicious Brownies,”–because they are! And healthy, but don’t hold that against them. Here is the recipe:
Black Bean Brownies
1 15-ounce can of black beans, drained and rinsed
1/2 cup honey
1/3 cup cocoa powder
3 eggs
2 tablespoons vegetable oil
2 teaspoons vanilla
1 teaspoon instant coffee powder
pinch of salt
Heat oven to 350 degrees. Butter an 8 x 8″ metal baking pan, or line with parchment.
Combine all the ingredients in a blender and blend until smooth. (To do this, blend the mixture for 30 seconds, and then pause to scrape down the sides of the blender. Then blend another 30 seconds.) The batter will be thin. Pour into the prepared pan, and bake for 20 minutes, or until just set. Allow to cool in the pan before cutting into 16 squares.
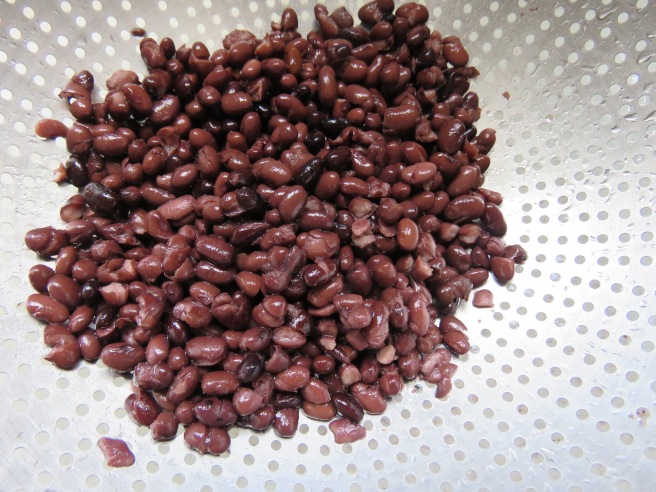
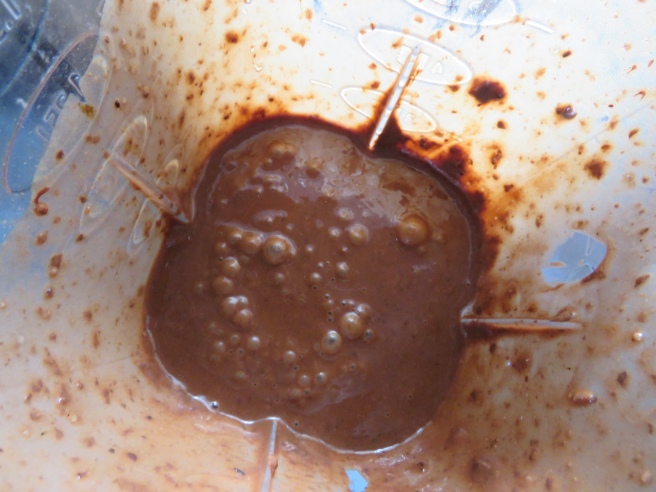
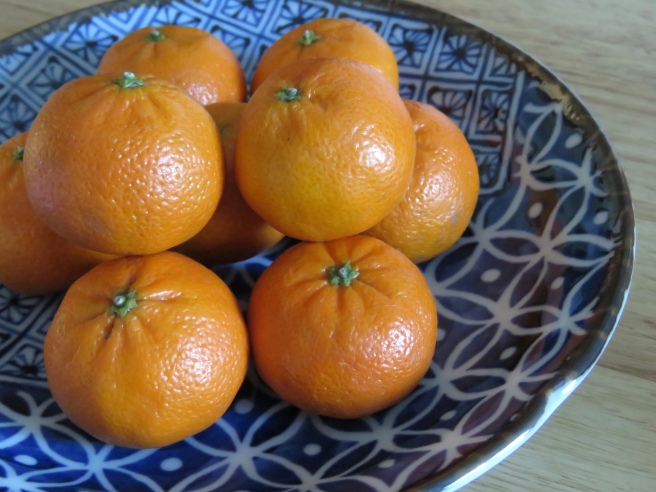
I used organic black beans and honey. You could also use extra virgin olive for this recipe, as the flavor is so mild. I used instant decaf coffee for the coffee powder. You are just adding this for the mild coffee flavor, not the caffeine.Rinsing and draining the beans. This is the moment of truth, that you are actually adding beans to your brownies!Measuring the honey.Measuring the baking cocoa.The ingredients will all fit in an average-size blender. You could also do this in a food processor. Looks like modern art!The batter will be thin and pourable.Not the most inspiring photo, but it shows how smooth and glossy the brownies are when they are done. Allow them to cool completely before cutting.We’ll be eating these beautiful little clementines along with the brownies. (only 9 carbs each)The brownies are small, but are delicious with a clementine. Total carbs are about 21 grams.Yum.The brownies can be cut up (they cut beautifully) and stored in a plastic container in the refrigerator.
Baking notes:If you are looking for a cake-like brownie, this may not be for you, since the texture is like a very light, moist fudge.
By the way, my husband Jim, who was diagnosed with diabetes last April, has to test his blood every day, and after eating one brownie and clementine, his test showed no insulin spike. Through eating low carb and exercising, he has brought his numbers below diabetic level. Yay!
Just a side note: To make the knitted doily shown in the first photo above, use instructions from my post on April 24, 2015. It’s fun!
Also, you are invited to check out my new blog, called My Illinois Nature Journal. Latest post: Keeping a Nature Journal. Learn how to begin nature journaling! I offer a post full of examples from my own journal to help you begin. See a page below. Peace to you. Fran
This being December 28, a day that dangles listlessly from the calendar, being neither here nor there in the old year or the new year, and this being that I’m in Illinois on a grey day with cold drizzling rain that falls remorselessly, I’ve decided to travel to Morocco. Not really, of course, but in my mind’s eye, floating on a cloud. I’ll be traveling by way of a wonderful cookbook called “Orange Blossom & Honey,” by John Gregory-Smith. (I also recommend his “Mighty Spice Express,” cookbook, to learn about exotic spices.) He had stopped at a little roadside cafe in a mountain pass in the Atlas Mountains (they extend across northwest Morocco), and had this salad along with lamb cutlets. The thought of the little cafe in the mountain pass fired up my imagination, and soon I was back from the store with the salad ingredients. It really is a good Middle Eastern-type salad sparked with the crunch and sweetness of glistening ruby pomegranate seeds. Here is the recipe, which includes a few of my changes:
Atlas Mountain Salad
1 red onion, finely chopped
juice of a lemon
2 tomatoes (see instructions for preparing these)
1 “hothouse” cucumber, peeled and finely chopped
1 red pepper, seeded and finely chopped
seeds from one pomegranate
3 tablespoons of olive oil
small amount of chopped parsley or cilantro
sea salt
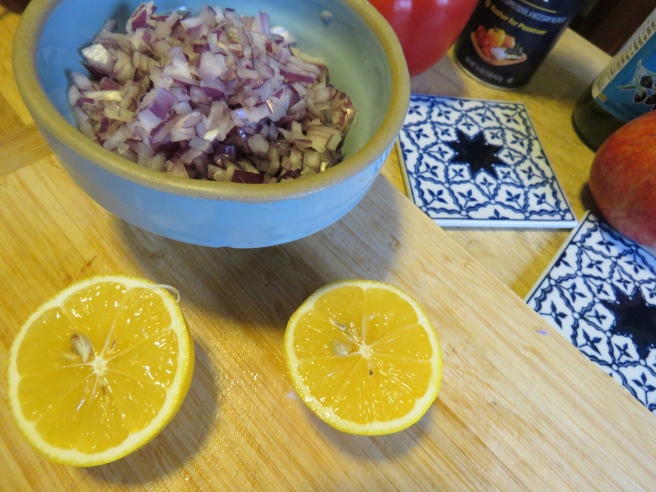
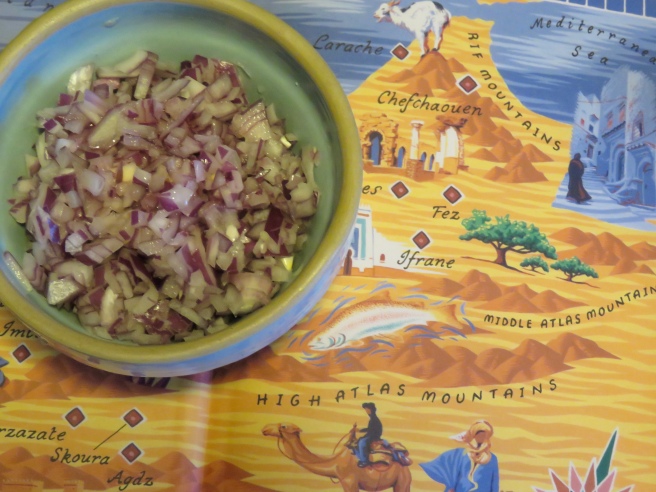
Put the chopped onion in a small bowl, and add the lemon juice with a pinch of salt. Stir. This will wilt the onion a bit. Put aside while you prepare the other ingredients.
Put the tomatoes, cucumber, pepper and pomegranate seeds in a serving bowl. Add the prepared onions with their juice, olive oil and a pinch of salt. Mix well. Garnish with the chopped parsley or cilantro.
The ingredients.
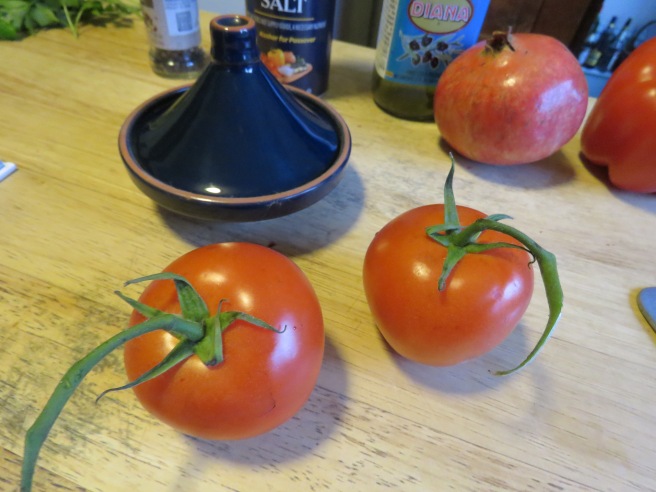
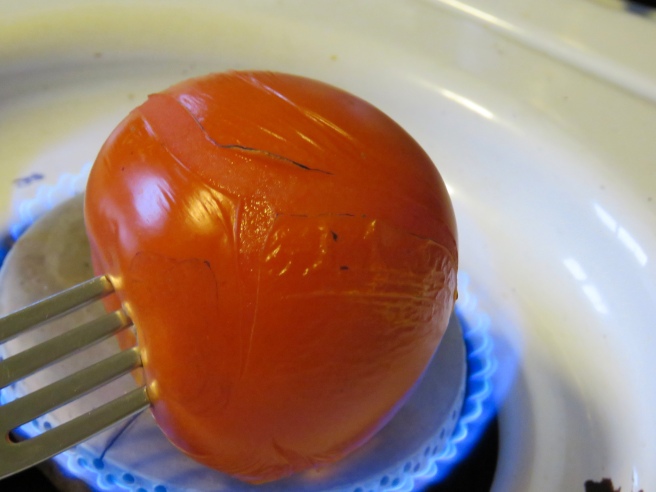
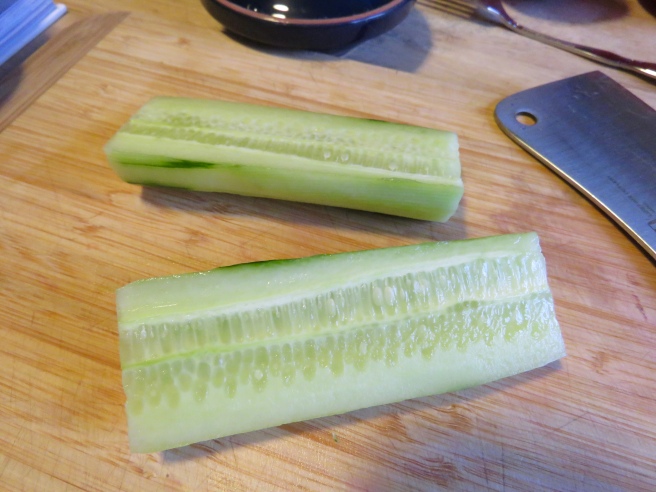
I used Meyer lemons, which are very juicy and have a thin skin and are not quite as tart as regular lemons, but you could use either kind.The red onion I used–this was actually a bit too big, so you could use a smaller one.Be sure to sharpen your knife or cleaver before chopping–it makes the task so much easier than muddling through with a dull blade.The chopped onion and lemons ready to be juiced.The onions and lemon juice set aside–this process takes the rawness and “bite” from the onions.Try to choose a pomegranate that is heavy for its size, and is a bit purple in color.With a sharp knife, score the pomegranate around its middle. Then twist the top and bottom in opposite directions. You may have to push pretty hard, but the two sides will separate.The two halves, showing the ruby red seeds.At this point, make sure you are wearing an apron. According to experts, you merely tap the top of each pomegranate half, and the seeds will fall out. Not! I scraped them out with a small spoon. This is a bit messy. A few bits of white pith may fall out, too. Pick them out, leaving only the seeds. Pomegranate juice stains, so, again, be sure to wear an apron. Hold the pomegranate half down into the bowl so the juice doesn’t spatter–much. You can Google “seeding a pomegranate” for various methods, but this worked for me.These were “tomatoes on the vine,” which have about as good a flavor as you will find this time of year. I’m including the little tagine spice holder in this picture–it’s not something I use very often–actually I have never found a use for it–but it is cute, so here it is.Removing the peel will leave us with tender tomato flesh. Impale the tomato on a fork, and hold over the gas flame until the skin wrinkles and splits. This is only dangerous if you are holding a camera in your other hand! The fork does not get hot. Rotate the tomato as the skin wrinkles.The tomatoes with their wrinkled skins. Hold them under some cool running water, and peel off the skins. This is actually pretty easy, and almost fun!Cut the peeled tomatoes in half, and squeeze out the seeds. Then chop up pretty finely.I used half a “hothouse,” cucumber, because it is less seedy than a regular cuke. I wrapped up the other half and put it back in the fridge.The seeds of this type of cucumber are small and tender, so I didn’t bother to seed it. If you use a regular cucumber, scoop out the seeds with a teaspoon.Cut off the top of the pepper and remove seeds and white pith. Slice and dice.The ingredients in the bowl, with the added olive oil and salt. I didn’t add all the onions, since it seemed like too much. So I put the remaining chopped onions in a covered container, and will use them in a salad tomorrow. By the way, the original recipe called for chopped mint. This is not always easy to find at my local grocery stores, and when I do use it, I’m not sure if I like it, so I used some parsley that was still growing under the snow in my garden. It’s a tough plant. But you could also use cilantro.Finished Atlas Mountain Salad, sprinkled with some freshly ground black pepper and some Turkish hot pepper.
Making notes: There is a lot of peeling and chopping in this recipe and you may wonder if it’s worth it. It all depends on your point of view. From my standpoint, assembling the vividly colored vegetables, immersing myself in the fresh smells and textures during preparation, and taking a mental trip to Morocco was fun. It’s my form of meditation. And, we had a delicious, fresh-tasting salad, which I served for dinner with homemade baked sweet potato chips and grilled chicken sausages. We had peaches for dessert (purchased frozen peaches that microwaved until warm). And wine. So it was a good meal, and the otherwise grey afternoon flew by.
Baking is always an adventure, but some recipes provide more thrills and chills than others. Case in point in this recipe for Cheese Straws that I ran across in the Fannie Farmer Cookbook. I had been invited to a Christmas gathering, and had been mulling over what to bring. The Cheese Straws in the Appetizer chapter sounded good–there would be lots of Christmas cookies to eat at the party, so something not sweet sounded like a good idea. And, they could be made ahead. Cheese Straws it was!
Minutes into the recipe I was sweating. It called for 1/4 pound of butter, and the dough was not coming together. It would never come together. I did a Google, and, sure enough, found another blog regarding this recipe–the unfortunate baker added water to the dough to help it come together. I know that in baking, water + flour = glue, so instead of water, I tossed in another stick of butter. Couldn’t hurt! This did come together, perfectly, and I realized there had been a typo. But all’s well that ends well! The straws were crispy and sharp with the Cheddar cheese. So good, that I’ve made them again–they will be perfect for an upcoming bake sale, and will make nice small gifts. Here is the (updated) recipe.
Preheat the oven to 400 degrees. Line a baking sheet with parchment paper. Cream the butter until light; add the flour, cayenne, cheese and salt. Roll out on a floured surface, and cut into strips 5 inches long. Place on the prepared baking sheet and bake for 6 to 8 minutes, or until golden.
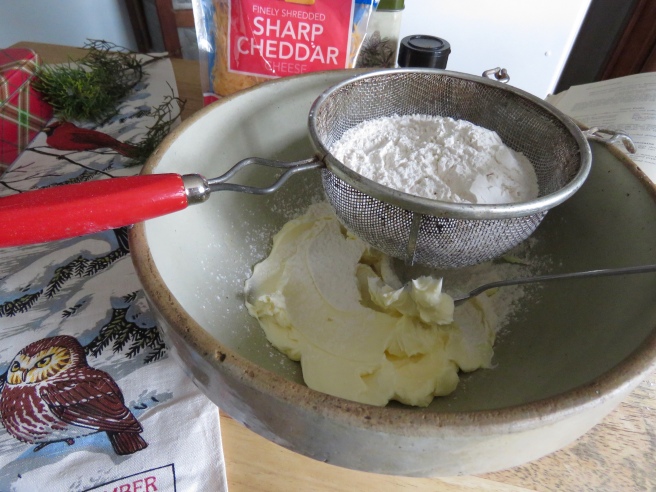
The original recipe called for a pound of cheese, but truth be told, nothing needs a whole pound of cheese in it. So I used a 12-ounce bag of finely shredded sharp cheddar, and it worked perfectly.
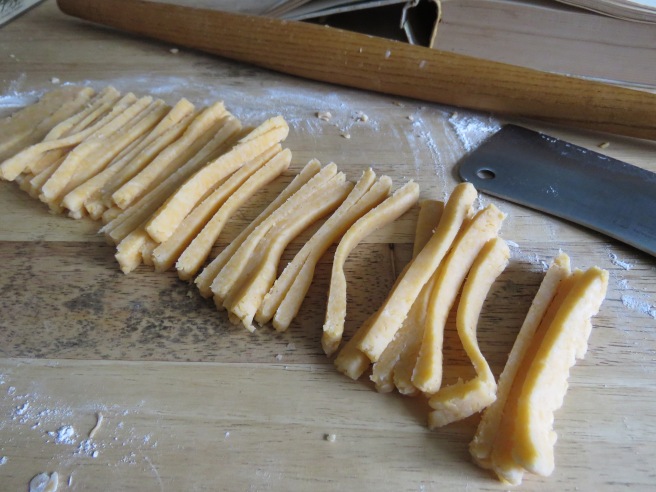
Two sticks of softened butter being thoroughly creamed. This is basically a shortbread dough, and creaming the butter well will help the dough come together and bake evenly.I measured the flour and sifted it into the bowl. Again, helps to create an even-textured dough.Adding in the shredded cheese, pepper and salt. I used a chipotle hot pepper powder, which adds a little bit of a smoky flavor, but cayenne is fine, too. Or, you could leave it out.Smear the cheese and flour into the creamed butter. At first it may seem like it won’t work, but after about five minutes of determined kneading and cheerful whistling, you will see the dough come together. Don’t be afraid to knead it–it won’t be tough. Form it into a large log.Cut it into four pieces.Roll each piece into a cylinder about 12 inches long. Knead it a bit as you roll, so there are no gaps inside the cylinder.Roll the log into a rough rectangle, about 1/4″ or a bit less, thick. It doesn’t have to be perfect.The rectangle ready to be sliced.Cut into strips about 1/4″ inch wide. (They will be about four to five inches long.) The end pieces can be baked for the birds.Scoop some strips up with a spatula to transport over to the prepared baking sheet–no need to do it one by one.Space about one inch apart, and bake until golden, about 6 to 8 minutes.This makes dozens of cheese straws–my calculations came up with 12 dozen, or was it 16 dozen–could that be right? How ever many, it’s a lot.Packed up in a tin. I sealed it with tape and placed it in a cool dark place. I will bag them up for the bake sale in a day or two. They are perfect with a glass of red wine.
This little sparrow seems to be saying “Merry Christmas,” and that is my wish to you. Peace to you. Fran
This is an early visit, and St. Nicholas will be dropping off recipes, not presents. These are not new recipes, but rather, the best kind–old recipes. Tried and true old chestnuts. I have searched the archives of my blog, and have come up with the best of the best for you to consider making for the coming holidays.
The first recipe is for Glittering Shortbread Stars. I have made this recipe a dozen times, and it makes the best and easiest shortbread cookie you could wish for. The dough doesn’t need chilling, and is easy to roll out. I’ve made it into stars, but also into llamas. Go for it!
Glittering Shortbread Stars
Lumps of Coal are fun and easy to make. They are crunchy with a fudgy interior. Also, they are great conversation pieces, and go well at Christmas bake sales.
Lumps of Coal
When you have to bake, but don’t really want to or are in a hurry, Almond Cookie Brittle shows up to help. No rolling out or elaborate shaping. And the cookie is crisp and delish.
Almond Cookie Brittle
Moist, old-fashioned cookies, Brown Sugar Cranberry Cookies are like something Red Riding Hood would carry in her basket as she walked innocently through the deep dark forest.
Brown Sugar Cranberry Cookies
Melt-in-Your-Mouth Cranberry Pie maybe isn’t for Christmas dinner, but instead, for the day after Christmas–along with the turkey sandwiches. Easy and good, and a way to keep the celebration going.
Melt-in-Your-Mouth Cranberry Pie
Moist, spicy and delicious, and yes, more cranberries! Here is a recipe for Cranberry Gingerbread. Can be made a day or two or three ahead.
Cranberry Gingerbread
More cranberries! There’s something so perfect about them for Christmas. Here is a Fresh Cranberry Pound Cake, so pretty when sliced. Also can be made ahead.
Fresh Cranberry Pound Cake
Buttery and cinnamon-y–Jan Hegels are nice Christmas cookies. Can be made ahead and kept in a tin.
Jan Hegels
Okay. Even more cranberries! They are delicious in these Cinnamon-Frosted Applesauce Cranberry Cookies. A bit similar to the above Brown Sugar Cranberry Cookies, but these are glazed with a nice frosting, and are incredibly moist.
Cinnamon-Frosted Applesauce Cranberry Cookies
Find more good Christmas baking recipes by looking in the Something for (almost) Nothing recipe archives, in the “Decembers” of each year. Also find Christmas crafts such as the Squirrel Garland, found along with the above Cinnamon-Frosted Applesauce Cranberry Cookies. Peace to You. Fran
Hi! Before we get to the delicious Baked Chile Chicken recipe, I’d like to mention that my new blog, called “My Illinois Nature Journal,” is up and running. Hope you can stop by, take a look, and sign up (at bottom of page) to receive notifications of new posts. Today’s post is about house sparrows, plentiful in Illinois as they are everywhere else! I have a page of sparrow watercolors, plus a photo. They are surprisingly individual and interesting little birds.
Ok. Back to the delicious Baked Chile Chicken recipe! I am always seeking ways to make the ubiquitous chicken breast as tasty as possible, and I think this recipe does it. It’s easy (no frying, just stick it in the oven) and delicious (bright with the flavors of chile powder and garlic). Also, I add a whipped honey butter mixture to serve on top. (More about this later.)
Here’s the recipe:
Baked Chile Chicken
4 chicken breast halves (bone in)
3 tablespoons extra virgin olive oil
1-3 cloves garlic, pressed
2 teaspoons chile powder
1 teaspoon garlic powder
salt and pepper
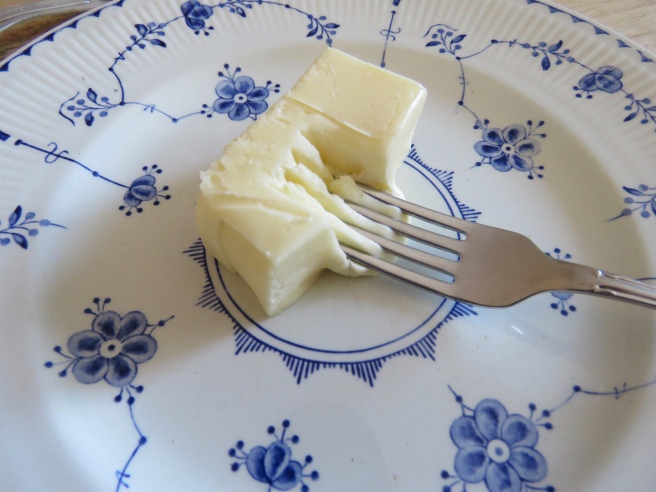
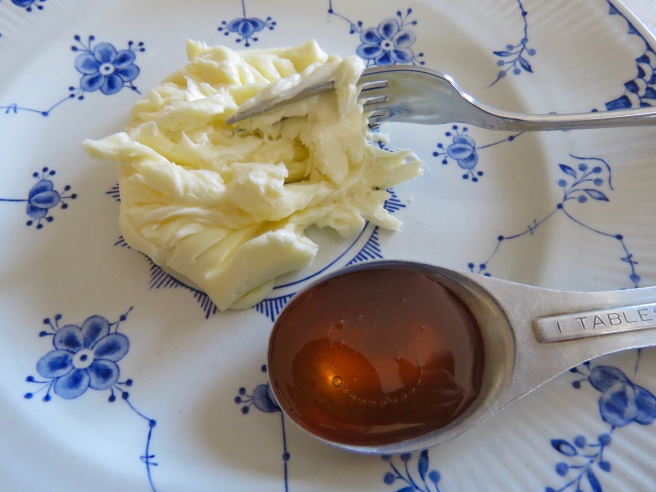
Ingredients. The salt is kosher salt, the oil is extra virgin olive oil.Mix the olive oil, fresh garlic, chile powder, garlic powder, salt and pepper together in a large bowl. Coat the chicken breasts in the mixture (there are four in the bowl), and let them absorb the flavors for about an hour, if possible. Then arrange the chicken pieces in a foil-lined 13 x 9″ baking pan, and bake for about 55 to 60 minutes., or until juices run clear when the chicken is pierced with the tip of a knife.Meanwhile, for the whipped honey butter, you will need half a stick (4 tablespoons) butter and one tablespoon of honey.
Note: The idea for the whipped honey butter comes from a Chicago restaurant, which serves the butter on top of fried chicken. The combination is delicious, but for the home cook, baking the chicken is so much easier than deep frying.
To make the butter, soften half a stick of butter in the microwave. (About 20 seconds at half power–but experiment judiciously.) It should be soft as shown.Add one tablespoon honey to the butter. This will make a slightly sweet butter, but you can add more.Mash the honey and butter together until fluffy. It’s easy to do this on a plate, and there is less cleanup than if you use a blender.To go along with the chicken, I decided to steam some “broccolini.” This is like broccoli, but with longer, tenderer stems. You could also use broccoli or rapini, which is leafier. Either way, the dark green vegetable goes well with the spicy chicken.I sliced the broccolini into individual stems.I steamed the broccolini stems (salting them first) for about 20 minutes, or until tender.Also, meanwhile, I gathered some apples for a super easy apple dessert we have a lot. These are four small Gala apples.Peel the apples, cut into quarters, and remove the cores. Then chop and place in a small saucepan along with about an inch of water.Cook over a medium flame for about half an hour, stirring occasionally until softened, like applesauce. These apples are naturally sweet, and I don’t add extra sugar, but you can, if you wish.The chicken should be done in about 55 to 60 minutes. Baste it occasionally with pan juices.With a dollop of honey butter and a side of broccolini (and a glass of red wine), dinner is served!Spoon the warm apples into a little bowl, and top with heavy cream. You can sprinkle with cinnamon, if you wish. The warm apples are sweet and delicious with the cream.
Hi Everyone. When I last posted I mentioned that I would moving over to a new blog and discontinuing “Something for (almost) Nothing.” So I’ve been working on the new blog, which is called “My Illinois Nature Journal.” It’s all about the natural world of Illinois–the birds, the butterflies, wildflowers and more. Creating a new blog is like building a house, and I’m finally at the point where I’m hanging the curtains and sweeping up the sawdust–it’s almost ready. But meanwhile, I keep coming across new, great, useful recipes and I want to share! So it looks like I’ll will go forward with “Something for . . .” adding new recipes when something irresistible comes along. And by next week, I will post a link to My Illinois Nature Journal.
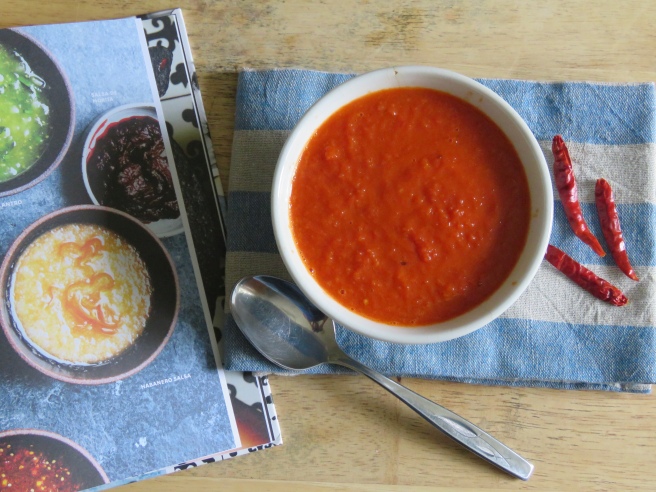
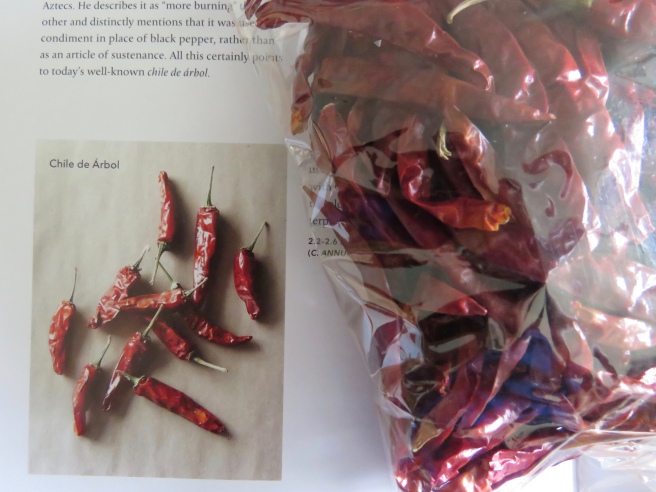
So meanwhile, I have found a great salsa recipe to share. It’s from an excellent cookbook called “Nopalito: a Mexican Kitchen,” by Gonzalo Guzman, and is called Salsa Frita de Arbol. I’ve been cooking low carb, and looking for quick, flavorful additions to our dinner menu, and salsas fill the bill. (Jim has lost 30 pounds, and I have lost 20 eating the low carb way–we are converts!) Here is the recipe, which I’ve adapted a bit.
Salsa Frita de Arbol
Salsa Frita de Arbol
2 tablespoons extra virgin olive oil
2 dried arbol chiles, stemmed and seeded
1 clove of garlic, put through a garlic press
2 cups canned diced tomatoes and their juice
or a 14.5 ounce can
salt
In a small skillet, heat the oil over medium heat. Add the chiles, turning occasionally until they are dark red, about 30 seconds. Transfer the chiles to a plate. In the same hot skillet, saute the pressed garlic, stirring so it won’t burn. Add the tomatoes and and salt and bring to a simmer–let cook for about 10 minutes.
Allow the mixture to cool off a bit, and then puree in a blender (see safety cautions below) until smooth. Taste and add salt. Can be served warm or cool.
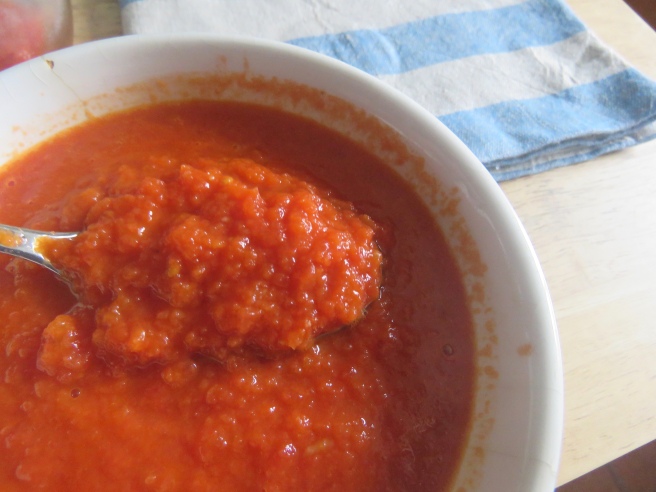
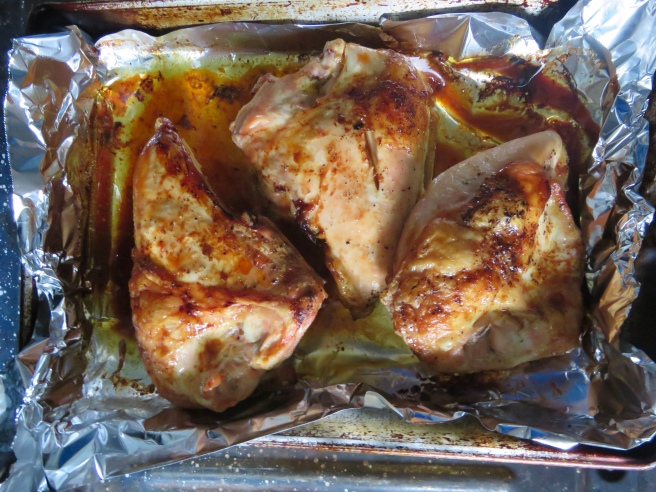
The ingredients. I found the chiles arbol at my local grocery store. You could also check at a Hispanic grocery. This is a pretty commonly used chile. Notice that it’s dried! The recipe calls for 2 cups of diced tomatoes, but the 14.5 ounce can worked perfectly.Here’s the Nopalito cookbook, plus an interesting book on peppers by Maricel Presilla. I guess you can tell I’m into peppers right now!A closeup of the arbol chiles. Most have lost their stems during the drying process. Arbol peppers are hot–they are hotter than jalapeños.This gives you some idea of the size of the chiles. (Only use one garlic clove in the salsa–not the whole head!)If they have stems, remove them, and then shake out the seeds.I didn’t bother to measure the extra virgin olive oil–just poured in two glugs. Heat the oil over a medium high flame and add the chiles and cook for about 20 to 30 seconds. They will give off some fumes, so stand back! (You might want to keep a clean kitchen towel at hand to place over your mouth and nose while the chiles are cooking. The fumes aren’t bad, but they could cause coughing.)The sizzled and darkened chiles.Remove the chiles and set aside. Add the pressed garlic and stir briefly. It won’t take long to turn gold–watch carefully!When you add the tomatoes, there will be a lot of sizzling–you might want to cover the pan briefly with a lid until it settles down. I added back just half of one of the small chiles. It made for a hot salsa. The salsa will be pretty hot even if you don’t add back any of the chiles.Be careful when processing in the blender. Let the mixture cool off a bit before pouring into the blender. Fold up a kitchen towel, put on the blender lid, and hold the towel and lid down firmly. Hot liquids can burst out of a blender if you are not careful. Just “pulse” the mixture a few times, and then briefly (20 to 30 seconds) puree it. I like this salsa to be a bit chunky.This shows the chunkiness of the salsa, though you can puree it longer if you want it to be smooth.What did I do with the salsa? I set it aside, and marinated three chicken breasts in salt, pepper, olive oil, a bit of chile powder and some fresh lime juice. Then I baked them for about an hour at 375 degrees.While the chicken was baking, I chopped up a big bunch of broccoli rabe, also called rapini. It’s a bitter green, and tastes good with roasted or baked chicken.I sautéed the chopped broccoli rabe in olive oil, salt, pepper and fresh garlic. It cooks down considerably.Okay, maybe not the greatest food photography, but I was hungry! I hope it shows that if you eat fresh, colorful food, honestly, you don’t need the potatoes. With a glass of merlot, this tasted good! For desert we had fresh strawberries with cream (no sugar).
Cooking notes: The arbol chile is hot, so if you are a hot sauce beginner, I would not add back the chiles before pureeing in the blender. The oil the chiles cooked in will be spicy enough. On the other hand, adding half a sautéed chile made the sauce pretty darn hot, so you need to know your own tastebuds. By the way, one of the big pluses of this recipe, besides it tasting so good, is that if you have some diced canned tomatoes on hand, along with the dried chiles, you can make this fresh salsa any time of the year, even when it’s hard to find a good tomato. Hope you enjoy. Peace to you. Fran
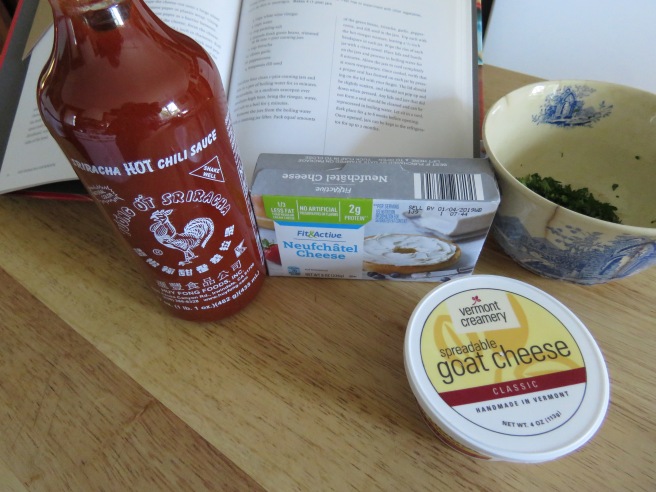
Sriracha Hot Chili Sauce is having a moment now–you may be familiar with its red bottle emblazoned with a rooster, and its jaunty green cap. It has long been a cult favorite, I think because of the cute bottle, but, also, for a hot sauce, it’s not super hot. At any rate, the other day, while wandering through a thrift store, I found a 97 cent copy of “The Sriracha Cookbook,” by Randy Clemens and quickly found myself wanting to add Sriracha to everything.
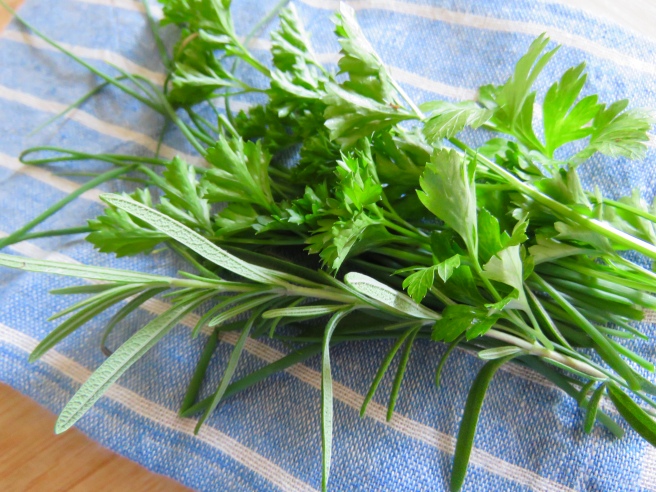
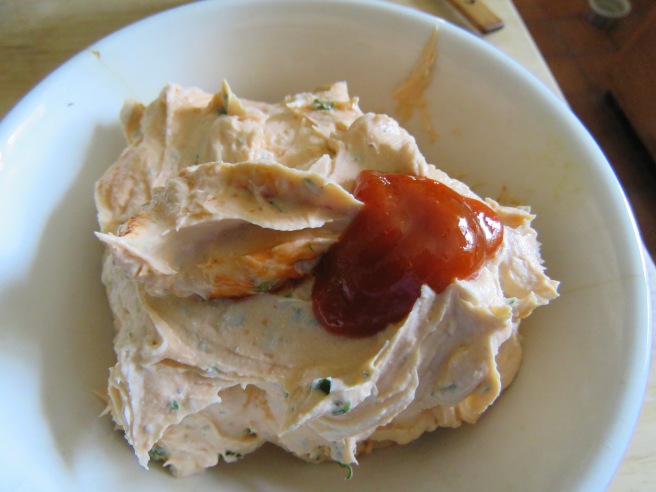
This all leads up to why today’s post is about a Fluffy Sriracha Dip. Why is this dip so fluffy? Well, when I went to the store to buy goat cheese, which is one of the ingredients, I accidentally purchased spreadable goat cheese. This recipe started as a Sriracha cheese log, but because of the spreadable goat cheese, it ended up as a delicious, fluffy dip. And so new dishes are discovered. Who needed a cheese log, anyway? The dip is spicy hot–but not incendiary–and creamy with a green herbal note. So good with fresh cut-up veggies. Here is the recipe. (Don’t freak out about the fresh herbs–more about them later.)
Fluffy Sriracha Dip
2 tablespoons chopped fresh rosemary
2 tablespoons chopped fresh parsely
2 tablespoons chopped fresh chives
1/2 teaspoon freshly ground black pepper
1-8 ounce package Neufchatel cream cheese, at room temperature
4 ounces spreadable goat cheese, at room temperature
3 tablespoons Sriracha
1 clove garlic, put through garlic press
In a small bowl, combine the chopped herbs and the pepper. Toss together.
In a larger bowl, combine the cream cheese, goat cheese, Sriracha, garlic and most of the herb and pepper mix. Mash with a fork until evenly blended.
Scrape into a small bowl, and serve with cut-up fresh veggies.
First, thing, I went to pick the fresh herbs from my garden. If you don’t have fresh herbs, consider chopping some fresh parsley with a couple of green onions, and using that.
I also picked a hot pepper to use as a garnish. Again, this is optional.The freshly ground black pepper and the chopped herbs.Ingredients. The Neufchatel cream cheese is lower in fat than regular cream cheese (it’s made from milk, not cream), but is still good tasting and creamy.I’m not always the brightest bulb in the pack, and I spent several moments trying to shake the sauce from the bottle, not realizing there was an inner seal. So this is an FYI.The original recipe called for mixing wit a stand mixer, but it’s so much easier to use a fork. I mashed with a fork, and then brought it all together at the end with a spatula.Scrape the mixture into a pretty little bowl, and top with a blob of Sriracha. Swirl through the mixture with a knife.Swirly, fluffy dip. Sprinkle on remaining chopped herbs or parsley.I sliced the hot pepper and used it as a garnish. It looks like a strange, hot pepper sea creature.Yum.We had it for lunch!
Making notes: As I’ve mentioned, the fresh herbs are optional. The parsley, green onion mix will work fine. Also, this dip is all about the Sriracha hotness along with the creamy texture, so, again, don’t sweat the herbs. If you can only find “regular,” not spreadable goat cheese, make a cheese log! Either way, it’s good.
Standing in the sunny garden this morning, I’m aware that we are in bee season. There are bumble bees, honey bees (not sure, but I think so), and many smaller bees, all gathering pollen while the sun shines. The butterfly is our last Monarch, released a few days ago. I will miss them! Peace to you. Fran
Bumble bee on phlox.Honeybee? Not sure.Small, unidentified bee-like creature.